The Main Solar Maps Window

Contents
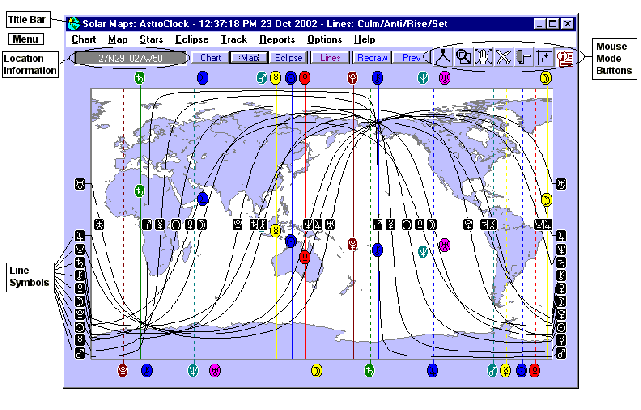
When Solar Maps starts up, it needs to prepare the map database. This may take several seconds, and the progress of this operation is shown with a progress bar in the middle of the screen. When this has finished, you will see a Window like the following one.
Like other windows, the Solar Maps main window may be minimised, resized and moved around the screen. Whenever you resize the window, the map will be redrawn automatically to fit the new window size.
The Title Bar - the bar across the top of the window - normally displays information about whatever chart, eclipse and track or event is currently being displayed, and what kind of astrological lines are being displayed. Some examples are
Transits 25 Jan1997 - Natal - Lines: MC/IC/Rise/Set
AstroClock - 2:13 PM 23 Jul 1996 - Lines: MC/IC/Rise/Set
John Smith - Natal - Lines: Local Space
John Smith - Natal & Eclipse of 26 Feb 1998 - Lines: MC/IC/Asc/Dsc
Eclipse of 26 Feb 1998
The menu is the means of accessing all the options within the program. The main headings in the menu are
ŌĆó |
Chart - Options for selecting and displaying charts and astrological lines on the current map |
ŌĆó |
Map - Options for selecting and editing maps, and exiting from the program |
ŌĆó |
Stars - Options for selecting stars to be displayed with the current chart |
ŌĆó |
Eclipse - Options for selecting solar eclipse lines to display on the current map |
ŌĆó |
Track ŌĆō Options for selecting tracks and events to plot on the current map |
ŌĆó |
Reports - Options for selecting various listings and reports |
ŌĆó |
Options - Special display and advanced options |
ŌĆó |
Help - On-line help |
The location information box displays the current position of the cursor over the map in terms of latitude and longitude. It also displays angular and linear distance between two points when used with the Measure mouse mode option, and Ascendant and Midheaven positions when the right hand mouse button is held down.
The mouse mode buttons enable you to switch between various modes of mouse operation. These modes are
ŌĆó |
Measure - To measure distance on the map |
ŌĆó |
Zoom - To zoom into a region on the map |
ŌĆó |
Move - To move the map in any direction |
ŌĆó |
Relocate - To select a point to relocate a chart to |
ŌĆó |
Fill - To fill regions of the map in various colors |
ŌĆó |
Rulers - To add reference ruler lines to the map |
ŌĆó |
Interpret ŌĆō To view interpretations of a planet line or see a relocation report |
See Using the Mouse for more information on the mouse modes.
The line symbols which appear around the edge of the map (and on some lines within the map itself) indicate the line type of whatever line it is attached to. For example, the As/Venus symbols indicate that the attached line is one along which Venus is rising. When in interpret mode, it is possible to use the mouse to click on any such symbol to see an interpretation of that line. See Viewing Interpretations for a more detailed explanation of this feature.