Using Dials and Pointers
In the "View Chart" window it is usually possible to alternate between displaying a chart wheel and a dial display of the same chart or charts by simply selecting the desired option with the mouse from the Wheel/Dial drop-down list (just above the "ReDraw" button). The style of wheel or dial that is displayed depends on whatever is selected as the default style under the Wheel Styles and Dial Styles of the Chart Options menu.
This option has no effect if the displayed page is one that uses a specifically named wheel or dial style (see Editing a Page Design File for information regarding this). However, if you are using any of Solar Fire’s pre-defined displays from the View menu, such as the Biwheel or Wheel+Grid options, or if you are using an ordinary page layout which uses default display styles, then this option will work as expected.
Whenever a dial is displayed, a pointer is displayed in the middle of the innermost chart in the dial. Initially this pointer will be pointing to the zero point on the dial scale. You can move the pointer in a variety of ways, set an orb for the display of midpoints, and select which chart the pointer is associated with. Before any of these things can be done, you must first switch on the pointer options box.
>> To switch on the pointer options box
•Click anywhere inside the innermost chart of the dial that you want to use.
If the page you are viewing has more than one dial on it, then the pointer options box will only appear inside one dial at a time. Clicking on another dial will switch it off in the previous dial, and switch it on in the newly selected dial.

>> To step the pointer around the dial
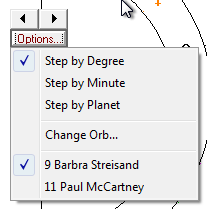
1.Click on the Options button in the pointer options box to see the drop-down menu
2.Select one of the following Step options
•Step by Degree - Step by one degree on the dial scale at a time
•Step by Minute - Step by one minute of a degree on the dial scale at a time
•Step by Planet - Step to the next planet position on the dial
3.Click on the left or right arrows on the spin button above the options button. Each click will step the pointer to the next degree, minute or planet position on the dial, depending on which step option was chosen.
If the dial is a multiwheel, then the pointer will always initially be associated with the innermost chart in the dial. However, you can select another chart to use the pointer with, as follows.
>> For a multiwheel - to select which chart to use the pointer with
1.Click on the Options button in the pointer options box to see the drop-down menu.
2.Select one of the charts listed at the bottom of the menu.

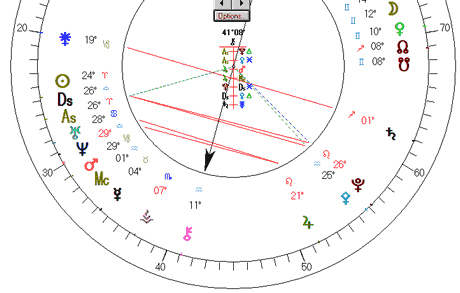
When the pointer reaches a position where it is at the midpoint of two planets in the dial, then a solid red line is drawn between those two planets. If those two planets also happen to form an aspect in the chart, then a dashed line is drawn from each planet to the center of the dial. The dashed line takes on the same color as the color of the aspect is formed, according to the current selected aspect colors.
In addition to the lines which appear, a midpoint tree is displayed underneath the options box indicating which planets are forming the midpoint to the pointer position, and if an aspect is formed in the chart, then the aspect symbol is also displayed.
In the example shown, the pointer is pointing to Chiron which is at 41°08’ in the dial, and this is the midpoint in the dial of the Saturn and Juno, of Pluto & Pallas and the Ascendant/Descendant axis, and also of Jupiter and the Midheaven, and Jupiter and Mars. Additionally in the chart, Pluto and the Ascendant are in trine (120°) aspect, Pallas and the Ascendant are in sextile (60°) aspect, Pluto and the Descendant are in sextile (60°) aspect, and Pallas and the Descendant are in trine (120°) aspect.
As the above example is using a 90° dial, where the Pointer is pointing to (Chiron in above example) is not necessarily the actual midpoint of the planets shown in the tree and by the lines. However when the Dial Pointer position is not the actual midpoint of the planets in the tree, it will be in some hard aspect to the midpoints of the planets in the tree. If you wanted to see soft aspects you could use a 120° dial. A 30° dial will show a variety of both hard and soft aspects.
Initially the orb for midpoints and aspects is set to 1°00’. However, you can change this orb. The orb is measured in terms of a 360 degree circle, regardless of the modulus of the dial, so for example a 1 degree orb corresponds to 1/4 degree on the dial scale of a 90 degree dial, and to 1/8 degree on the dial scale of a 45 degree dial.
>> To change the orb of the midpoint tree in the dial
1.Click on the Options button in the pointer options box to see the drop-down menu.
2.Select the Change Orb option.
3.This will display a dialog box which allows you to enter the orb that you require, in decimal degrees or degrees and minutes, separated by a space.
