Editing Cities

Contents
Solar Maps initially contains a selection of city files which have been split up to cover various geographical regions. The city name entries contained in these files may be plotted on maps, or they may be used to help select a location for a report or chart relocation. It is possible to customise these files by adding, deleting or editing individual entries, creating new files or copying entries between files.
Each stored map in your program may be associated with a city file of your choice. By default, any new map that you create will automatically become associated with the same city file as the map from which it was derived. For example, when you create a new map using the ÔÇťNewÔÇť item under the ÔÇťMapsÔÇť menu, the city file world.smc is associated with that map. If you create a new map by zooming into a smaller region, and then save it under a new map file name, then that map will also be associated with the world.smc city file.
>> |
To associate a different city file with your currently displayed map |
1. |
Select the ÔÇťMap Options...ÔÇť item from the ÔÇťMapsÔÇť menu. |
2. |
Click on the ÔÇťCity File...ÔÇť button. |
or
1. |
Select the ÔÇťEdit Cities...ÔÇť item from the ÔÇťMapsÔÇť menu. |
2. |
Click on the ÔÇťSelect File...ÔÇť button. |
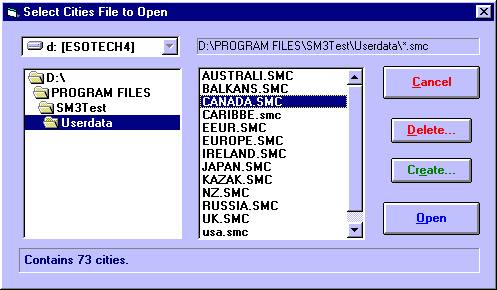
In either case, this will display the ÔÇťSelect City File to OpenÔÇŁ dialog box.
>> |
To select a file from the list of city files |
Click on the file name in the list and then click on the ÔÇťOpenÔÇť button, or double-click on the file name.
Note that when you click on a file name, a caption appears in the box along the bottom of the window indicating how many city entries are contained in that file.
All of the city files are initially stored in Solar Maps USERDATA directory, but if necessary, you can choose a different disk drive by selecting an item from the drop-down list of drive names, and look in a different directory by double-clicking on directory names in the directory list box on the left. For example, you may wish to select the A: drive if you want to open a map which is stored on a diskette.
You also have the option of creating a new, empty city file, which you can later populate with city names.
>> |
To create a new city file |
1. |
Click on the ÔÇťCreate... ÔÇťbutton. |
2. |
Enter up to eight characters as a new file name. |
3. |
Click on the ÔÇťOKÔÇŁ button. |
The newly created (empty) city file will then appear in the list of files, and may be selected if desired.
After you open a city file, that file becomes associated with the current map. Note that the map must be re-saved after doing this if you wish this change to be permanent. You will be prompted to do so if you have changed the city file.
>> |
To add, delete or edit entries in the current city file for the current map |
Select the ÔÇťEdit Cities...ÔÇť item from the ÔÇťMapsÔÇť menu.
This will display the ÔÇťEdit CitiesÔÇŁ dialog box.
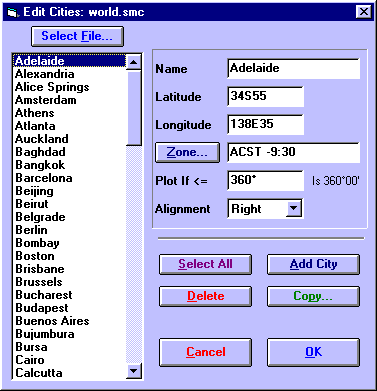
The information that is stored for each entry in the city file is
ÔÇó |
Name - This name is what appears on the map. |
ÔÇó |
Latitude - The latitude at which the name is to be plotted. See Entering Latitudes and Longitudes for a description of valid latitude formats. |
ÔÇó |
Longitude - The longitude at which the name is to be plotted. See Entering Latitudes and Longitudes for a description of valid longitude formats. |
ÔÇó |
Zone ÔÇô In earlier versions of Solar Maps, this was the timezone observed in that city. However, this data is now not used in any other part of Solar Maps, so it has been disabled. Timezones are now always found automatically, when required, from the embedded ACS Atlas which contains an extensive timezone database throughout the world, including daylight savings periods. |
ÔÇó |
Plot If <= - This controls how wide the map must be in order for the name to be plotted. For example, if a value of 100 is entered, then this name will only appear on maps which cover less than 100┬║ of longitudinal width. If its value is set to 360┬║, then this name will be plotted on every map with which this city file is associated. (Note that, for easy reference, the width of the currently display map is displayed just to the right of this field. If you enter a value smaller than the current map width, then it will be displayed only of maps of smaller size.) |
ÔÇó |
Alignment - This controls where the symbol is plotted in relation to the city name. If the Left option is chosen, then the name is aligned so that the symbol is on the left of the name (ie. +Name). If the Right option is chosen, then it is aligned with the symbol on the right (ie. Name+). If the Centre option is chosen then the name is centred over the symbol (ie. Na+me). |
The order of entries is initially always alphabetical. However, you can sort the entries in the following orders
ÔÇó |
Alphabetic ÔÇô From A to Z |
ÔÇó |
Latitude ÔÇô From most southerly to most northerly |
ÔÇó |
Longitude ÔÇô From most easterly to most westerly |
ÔÇó |
Plot Width Flag ÔÇô from largest plot width (most visible) to smallest plot width (least Visible) |
>> |
To sort the entries in the city list |
Click with the right hand mouse button over the list.
You will see a pop-up menu with the above sort options, from which you may select one.
>> |
To edit an existing entry in the city file |
1. |
Click on the required entry in the listbox. |
2. |
Edit the information fields. |
See the description of fields above.
>> |
To edit multiple entries at once |
1. |
Whilst holding down the ÔÇťCtrlÔÇť key, click on each of the required entries, or Click on the ÔÇťSelect All ÔÇťbutton to select all the entries in the list. |
2. |
Edit the required information fields. |
It is only possible to change the Plot If <= and the Alignment fields simultaneously for multiple entries in the list.
>> |
To add a new entry to the list |
1. |
Click on the ÔÇťAdd CityÔÇť button. |
2. |
Enter data into the information fields. |
You will then see the ÔÇťACS PC AtlasÔÇŁ dialog box which allows you to enter the city name and look up its details in the Atlas. These details will be inserted automatically into the information fields on this screen. If you wish to enter the details manually, then just Cancel the ACS dialog, and you will be able to enter the details yourself.
>> |
To delete one or more entries from the list |
1. |
Click on the desired entry or Whilst holding down the ÔÇťCtrlÔÇť key, click on each of the required entries. |
2. |
Click on the ÔÇťDeleteÔÇť button. |
You will be asked to confirm deletion before the selected entries are removed.
>> |
To copy one or more entries from this city file into another city file |
1. |
Click on the desired entry, or Whilst holding down the ÔÇťCtrlÔÇť key, click on each of the required entries. |
2. |
Click on the ÔÇťCopy...ÔÇť button. |
You will then see the ÔÇťSelect City File to Copy IntoÔÇŁ dialog box, from which you must select a city file into which the selected entries will be copied.
>> |
In order to exit from this screen |
Click on the ÔÇťOKÔÇť button.
You will be asked whether or not you wish to save the changes that you have made. If you choose to save them, then the entries will be saved and sorted into alphabetical order for next time you use this screen again. If you choose not save them, then any changes that you made using this screen will be lost.